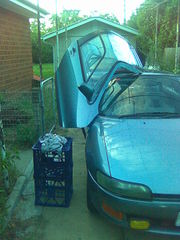
Toyota Sera Doors
From ThorxWiki
(Difference between revisions)
m |
(first image) |
||
| Line 6: | Line 6: | ||
This happened to me, so I set about to swap the strut for the one on my newly 'spare parts' (ie, it's a minor wreck) Sera. |
This happened to me, so I set about to swap the strut for the one on my newly 'spare parts' (ie, it's a minor wreck) Sera. |
||
| + | |||
| + | [[Image:Sera door strut - standalone.jpg|thumb|New strut in place, works perfect]] |
||
=== Tools needed === |
=== Tools needed === |
||
| Line 19: | Line 21: | ||
# bolt new strut at base (easy) |
# bolt new strut at base (easy) |
||
# celebrate |
# celebrate |
||
| − | |||
| − | |||
| − | ''pictures forthcoming'' |
||
== Links == |
== Links == |
||
Revision as of 20:03, 12 February 2008
The humble and uncommon Toyota Sera has these nifty nifty doors. So-called 'butterfly wing'. These are the doors which inspired the McLaren F1 - which in turn started the recent trend for supercars to have butterfly wings.
So the Sera is a trend setter, but otherwise, it's a pretty ordinary 2+2 coupe...
Anyway, a downside to the funky doors is they do not fail gracefully, and when the gas strut which pushes them open for you fails, you find out they are damn heavy.
This happened to me, so I set about to swap the strut for the one on my newly 'spare parts' (ie, it's a minor wreck) Sera.
Tools needed
- Socket set - 12mm socket
- philips head screwdriver
- shifting spanner
- two milk crates
Basic procedure
- prop door up on milk crates
- access then unbolt base of strut(easy). unbolt top of strut (little less easy)
- bolt new strut in at top (less easy again)
- bolt new strut at base (easy)
- celebrate
Links
- http://www.omicron.uk.com/sera/forum/index.php?showtopic=3804 - pre-existing guide I more or less followed
